
Wow, there is a lot to plan when you intend to change almost your entire house. We are in the throes of the planning stages in which we mangle our minds with the numerous different paths this remodel could take. We could decide to just do the kitchen addition or just the new bedrooms, or, or, or.... But I think we're going to stick with the original plan and do the entire project.
Which means the remaining questions are only
(1) Do we bother to get quotes from local builders in case they have awesome prices because of the recession?
(2) Do we make a schedule via which we plow through the remodel as quickly as possible or leave gaps in the work to recollect our thoughts and brush off some of the dust?
(3) How do we finagle the messiest parts of the project around Padraic's upcoming career as a kindergartner and the fact that we'd have to pay full price for day care even if the boys didn't attend for one millisecond in a given week?
(4) And what exact materials do we want to use for every single bit of this job?
Ah, yes, so you can see we've got a long road ahead of us. One involving a lot of trips to Home Depot, Lowes, 84 Lumber, and online stores to see what they've got out there in the world of 2 x 4s, roof trusses, countertops, kitchen cabinets, etc. And we need to put together at least a tentative spreadsheet of our wants and needs to make sure the budget we're considering will be as accurate as possible. (Yes, we're building in that extra 20%. Murphy's Law likes us better than it likes you, remember? The first half of its name is on our mailbox.)
If you have a product that you've used in your own home that you'd like to recommend, please leave a note in the comments. Our mission statement is this: To expand and improve upon our home, all the while with an eye toward making it practical in its livability. Meaning nothing that we would want to kill the boys for destroying will be allowed. Those kinds of upgrades can happen in approximately 2025 when, if we're lucky, they'll both be out of the house.
Sunday, January 17, 2010
Monday, January 4, 2010
Our home-improvement resume, part II
Because we are gluttons for punishment, and Ken has lots of tools and a hobby car, a year after we moved into the house and did all that wallpaper and floor-finishing work we said, "Hey, why don't we build a detached garage in the back yard?" The original layout of these split-levels had a one-car garage with a mudroom on the lower level, but a previous homeowner had long ago converted that space in our house into a family room.

Thank goodness because the house would be waaay too small without it, plus it was one of the main reasons we bought the place. Fireplace + wet bar = heck ya! In fact, we've spent every evening of the last two weeks in front of the fireplace you see here. Very nice and oh, so toasty.
But since we had the awesome family room, in trade there was no garage of any kind for Ken to use to store his wide assortment of tools, both power and non. He dreamed of having a place to park his Caprice and have a workshop in which to do all sorts of handyman type stuff. Or, as his friend Jay so aptly put it, Ken built a garage so he'd have a place to store all the tools he bought to build the garage. Touche.
Ken started drawing up a variety of plans that could possibly become his new garage/workshop. Let's just say I nixed the 4-car version that would've taken up the entire width of our backyard and would've required us to pave most of the rest of it in order for cars to make it back there. I was pretty adamant that if we owned just over a quarter acre that part of it was going to be reserved for things like our (then future, now actual) kids playing. He eventually reduced his dream to a 2.5-car beast that would only take up the entire right-hand half of our yard, front to back. The plans were helped along by a few things Ken was gifted that he incorporated into the design: two garage doors (one huge one, one normal size) and a bunch of roofing trusses. Having those items set some parameters that helped solidify the dream into a reality. On paper. A lot of work was still ahead. And we won't even get involved in this story in the parts about the township office and inspector.
The first step, sadly, was to take down what was arguably the prettiest, healthiest tree on the entire property. We tried to work around it, and there was just no feasible way, so down it came. Sorry, tree! Somewhere I have a picture of it in all its glory, and if I ever find it I will post it here as a memorial tribute.
Then excavation began, ripping up our beautiful green lawn and turning it into this:

Sniffle. And then this:

And then, immediately after the entire footer had been dug, the rain came. Lots of it. And turned the footer into a moat. We had to sit around waiting for the moat to dry out before the concrete could be poured, which had to cure for about 45 years. And finally, after it was ready, the mason could come and set the block rows to support the walls. Being unskilled labor, I was assigned the job of spreading tar on the outside of the block before Ken backfilled with gravel. I was not very good at the job since at one point I clearly remember gluing my calf to my thigh with tar. Oops. But I finished my messy job, and then Ken got to backfill with gravel, using this handy little apparatus that I got to drive around a few times, too (also not very well):

A quick word about gravel. We used many, many tons of it for this job. So many that I lost count, but it got to be that the gravel truck was a staple in our neighborhood, that guy came to our house so many times. Thankfully, on none of his visits did he hit the high-voltage wire running down the easement on the garage side of our property. Yay for him and us.
And so, with gooey tarred blocks in place and properly backfilled, it was finally time to start putting up walls to this would-be garage.

And once the 457,000 tons of gravel had settled as much as we thought it would, we brought in some firefighters who are experts at concrete work and had the floor put in. If you ever need a place to park a semi or perhaps a tank, this would be it. Besides all the gravel that's under there (the lowest layer is currently melting because of its proximity to the earth's core), the concrete pad is roughly 8-10in thick, which is nice and sturdy. Ken doesn't under-build things, no sirree.
 Hey, what's that tarp for? Oh, right. It started raining in the middle of the concrete work. Of course. Murphy's Law is no joke, people.
Eventually, the swamp of concrete cured to perfection, and then Ken and the neighbors tackled the raising of those free roof trusses:

 It was a hot summer and thirsty work, so everyone stopped for a beer now and then.

Then one day I finally got a chance to look up from all the pizza menus I was ordering from and noticed that there were walls and a roof forming:
 Ultimately, the presence of those items led Ken to feel like attaching other things to them, like siding and shingles.

 Until the blissful day came when the project (minus repairing the utterly damaged lawn surrounding it) was done, and we christened it The Garage-Mahal.


And then there was a lot of cleaning up to do. And all our friends and neighbors scurried away, praying never to get involved with another one of Ken's harebrained schemes ever again. Though that really hasn't panned out for them.

Thank goodness because the house would be waaay too small without it, plus it was one of the main reasons we bought the place. Fireplace + wet bar = heck ya! In fact, we've spent every evening of the last two weeks in front of the fireplace you see here. Very nice and oh, so toasty.
But since we had the awesome family room, in trade there was no garage of any kind for Ken to use to store his wide assortment of tools, both power and non. He dreamed of having a place to park his Caprice and have a workshop in which to do all sorts of handyman type stuff. Or, as his friend Jay so aptly put it, Ken built a garage so he'd have a place to store all the tools he bought to build the garage. Touche.
Ken started drawing up a variety of plans that could possibly become his new garage/workshop. Let's just say I nixed the 4-car version that would've taken up the entire width of our backyard and would've required us to pave most of the rest of it in order for cars to make it back there. I was pretty adamant that if we owned just over a quarter acre that part of it was going to be reserved for things like our (then future, now actual) kids playing. He eventually reduced his dream to a 2.5-car beast that would only take up the entire right-hand half of our yard, front to back. The plans were helped along by a few things Ken was gifted that he incorporated into the design: two garage doors (one huge one, one normal size) and a bunch of roofing trusses. Having those items set some parameters that helped solidify the dream into a reality. On paper. A lot of work was still ahead. And we won't even get involved in this story in the parts about the township office and inspector.
The first step, sadly, was to take down what was arguably the prettiest, healthiest tree on the entire property. We tried to work around it, and there was just no feasible way, so down it came. Sorry, tree! Somewhere I have a picture of it in all its glory, and if I ever find it I will post it here as a memorial tribute.
Then excavation began, ripping up our beautiful green lawn and turning it into this:

Sniffle. And then this:

And then, immediately after the entire footer had been dug, the rain came. Lots of it. And turned the footer into a moat. We had to sit around waiting for the moat to dry out before the concrete could be poured, which had to cure for about 45 years. And finally, after it was ready, the mason could come and set the block rows to support the walls. Being unskilled labor, I was assigned the job of spreading tar on the outside of the block before Ken backfilled with gravel. I was not very good at the job since at one point I clearly remember gluing my calf to my thigh with tar. Oops. But I finished my messy job, and then Ken got to backfill with gravel, using this handy little apparatus that I got to drive around a few times, too (also not very well):

A quick word about gravel. We used many, many tons of it for this job. So many that I lost count, but it got to be that the gravel truck was a staple in our neighborhood, that guy came to our house so many times. Thankfully, on none of his visits did he hit the high-voltage wire running down the easement on the garage side of our property. Yay for him and us.
And so, with gooey tarred blocks in place and properly backfilled, it was finally time to start putting up walls to this would-be garage.

And once the 457,000 tons of gravel had settled as much as we thought it would, we brought in some firefighters who are experts at concrete work and had the floor put in. If you ever need a place to park a semi or perhaps a tank, this would be it. Besides all the gravel that's under there (the lowest layer is currently melting because of its proximity to the earth's core), the concrete pad is roughly 8-10in thick, which is nice and sturdy. Ken doesn't under-build things, no sirree.
 Hey, what's that tarp for? Oh, right. It started raining in the middle of the concrete work. Of course. Murphy's Law is no joke, people.
Eventually, the swamp of concrete cured to perfection, and then Ken and the neighbors tackled the raising of those free roof trusses:

 It was a hot summer and thirsty work, so everyone stopped for a beer now and then.
Then one day I finally got a chance to look up from all the pizza menus I was ordering from and noticed that there were walls and a roof forming:
 Ultimately, the presence of those items led Ken to feel like attaching other things to them, like siding and shingles.
 Until the blissful day came when the project (minus repairing the utterly damaged lawn surrounding it) was done, and we christened it The Garage-Mahal.

And then there was a lot of cleaning up to do. And all our friends and neighbors scurried away, praying never to get involved with another one of Ken's harebrained schemes ever again. Though that really hasn't panned out for them.
Sunday, January 3, 2010
Our home-improvement resume, part I
People who we talk to about our remodel have two basic reactions:
(1) Are you crazy?
and
(2) That'll be awesome when it's done, but are you crazy?
If you know us at all, then you know that we are indeed crazy and that the craziness extends to much more than our home-related DIY projects. But, our insanity aside, we do have experience with home projects that have taught us important things such as that they
First, we changed the locks. A relatively easy step and one that all new homeowners do (or should do). Here's Ken getting his lock changing on:

But that was just the beginning of our experience as first-time homeowners of a roughly 50-year-old home. Let's see if you can spot any problems, say, with the master bedroom. What did you notice first? The eye-searing pink paint on the walls or the disgusting black patch of God-knows-what on the carpet? We'd known about the paint, of course, but the moldy patch of carpet had been hidden by furniture during our walk-throughs. Thanks, seller.
How about the living room?
 It's impossible to tell from the picture, of course, but those gorgeous blue plush carpets were soaked through with dog urine. (You probably weren't even looking at the carpets, though, because you were admiring the window treatments that were included in settlement. We sure made out like bandits there. We waited all of about 30 seconds before sticking those nicotine-stained treasures in the nearest trash can.)
And what's that on the walls? Is that wallpaper? Why, yes. It is wallpaper. But not just one layer. Oh, no. The three previous homeowners of this house apparently wanted to increase the R value of the walls at the same time that they redecorated, so they just layered paint and wallpaper and more paint and more wallpaper throughout those 50 or so years. Which meant that to do the job right, we had to take all those layers off and get right down to the drywall. So we left the stinky carpets on the floor to protect the hidden hardwood floors from further damage and got down to business.
We started the job of stripping the wallpaper using just hand tools and that gunk you spread on the wall to loosen the paper's glue, as I am doing in this picture,

but it quickly became clear that this was a bigger job than that process could handle, and we had to call in reinforcements in the form of some off-duty firefighters who had the knack for spraying the whole interior of the house (because every room had the multiple-layers-of-wallpaper problems) with a mist of water and scraping for all they were worth. At one point our main floor looked like this: and then this:
Somewhere during this process I began to think that maybe, just maybe, we had made a six-figure mistake in buying this house. There were tears, which I wiped away with my claw hands, damaged by all that damn wall scraping, and bullied onward. It was too late to look back, after all. For better or worse, we were homeowners.
In the end, there were about 8 total layers of paint and paper on the walls and (brace yourself) THREE layers on the living room ceiling. The freaking ceiling! WHO, I ask you, WHO wallpapers a ceiling? Baffling.
Eventually we got through the worst of the wallpaper scraping nightmare and moved on to problem #2: the gouges in the walls. After all that spraying, soaking, and scraping, the walls had not escaped unharmed. So the next stage of the process looked something like this:
 I lost count of how many 5-gallon buckets of spackle we went through (again, with help from some firefighter friends of my FIL), but the quotes we'd gotten from plasterers ranged from $450 to $4500, and we were a bit skeeved by the discrepancy between the estimates so we decided to make this yet another DIY project.
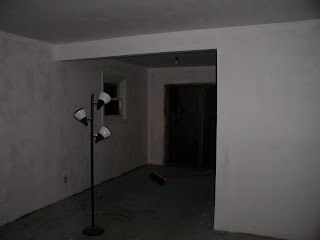
Finally, we got to the part where we could primer the walls.
 And then we painted, and it started to look a little like home. And don't forget that while my photos are mainly of the living room/dining room areas, the same processes of scraping, spackling, sanding, primering, and painting were going on in the master bedroom and upstairs hallway as well. We had a lot of help from friends, and we are grateful not only for their help but also for them staying our friends afterward.
As for the second and third bedrooms, well, they were in somewhat better shape. We painted over the wallpaper in both because there were limits to how much time we had to get the house move-in ready, and for the second bedroom that worked out just fine. In fact, the wallpaper has held firm in that room to this day. We were not so lucky in the third bedroom. The primer and paint soaked into the wallpaper and loosened it from the walls, taking some chunks of drywall with it. Leaving us with no choice but to gut the room down to the framing and redrywall it ourselves. From that experience I learned that drywall is very heavy, especially when you hold it over your head to do the ceiling. And that I'm not good at taping seams.
But with walls cleaned up and repainted, the last major step was to rip out the carpeting (now filled with all sorts of debris) and redo the hardwood floors.

I'd say Ken did a bang-up job, even though most of it was done during the wee hours of the night, after which he'd crawl back to our apartment, pass out, and get up in the morning to go to work. Check out his results:
 Glad I stuck it out and stopped crying over what I'd thought would be an endless money pit. With the walls and hardwood floors taken care of, the smaller projects remaining included putting up hated but necessary wallpaper in the kitchen and bathroom to hold the crumbling walls together until the day would come to gut those rooms (and the day is coming), redoing the kitchen floor with peel-and-stick tiles to make it slightly more durable and attractive, and painting the kitchen cabinets to cover the ugly wood they were made from.
It was much more work than we bargained for, but we were able to get enough of the big stuff done to move in on the last day of our apartment lease.
Having survived our first home-improvement project, the following summer we tackled the next one: the raising of the Garage-Mahal. Which will be the subject of my next post. Thanks for reading!
(1) Are you crazy?
and
(2) That'll be awesome when it's done, but are you crazy?
If you know us at all, then you know that we are indeed crazy and that the craziness extends to much more than our home-related DIY projects. But, our insanity aside, we do have experience with home projects that have taught us important things such as that they
- are messy,
- are more expensive than you account for,
- take longer than you figure on, and
- will make you stressed beyond your wildest dreams.
First, we changed the locks. A relatively easy step and one that all new homeowners do (or should do). Here's Ken getting his lock changing on:

But that was just the beginning of our experience as first-time homeowners of a roughly 50-year-old home. Let's see if you can spot any problems, say, with the master bedroom.
 What did you notice first? The eye-searing pink paint on the walls or the disgusting black patch of God-knows-what on the carpet? We'd known about the paint, of course, but the moldy patch of carpet had been hidden by furniture during our walk-throughs. Thanks, seller.
How about the living room?
 It's impossible to tell from the picture, of course, but those gorgeous blue plush carpets were soaked through with dog urine. (You probably weren't even looking at the carpets, though, because you were admiring the window treatments that were included in settlement. We sure made out like bandits there. We waited all of about 30 seconds before sticking those nicotine-stained treasures in the nearest trash can.)
And what's that on the walls? Is that wallpaper? Why, yes. It is wallpaper. But not just one layer. Oh, no. The three previous homeowners of this house apparently wanted to increase the R value of the walls at the same time that they redecorated, so they just layered paint and wallpaper and more paint and more wallpaper throughout those 50 or so years. Which meant that to do the job right, we had to take all those layers off and get right down to the drywall. So we left the stinky carpets on the floor to protect the hidden hardwood floors from further damage and got down to business.
Along the way we were like archeologists, identifying the eras that the various color schemes came from. All of them uglier than what came before. There was sea-foam green somewhere in there.
We started the job of stripping the wallpaper using just hand tools and that gunk you spread on the wall to loosen the paper's glue, as I am doing in this picture,

but it quickly became clear that this was a bigger job than that process could handle, and we had to call in reinforcements in the form of some off-duty firefighters who had the knack for spraying the whole interior of the house (because every room had the multiple-layers-of-wallpaper problems) with a mist of water and scraping for all they were worth. At one point our main floor looked like this:
 and then this:
Somewhere during this process I began to think that maybe, just maybe, we had made a six-figure mistake in buying this house. There were tears, which I wiped away with my claw hands, damaged by all that damn wall scraping, and bullied onward. It was too late to look back, after all. For better or worse, we were homeowners.
In the end, there were about 8 total layers of paint and paper on the walls and (brace yourself) THREE layers on the living room ceiling. The freaking ceiling! WHO, I ask you, WHO wallpapers a ceiling? Baffling.
Eventually we got through the worst of the wallpaper scraping nightmare and moved on to problem #2: the gouges in the walls. After all that spraying, soaking, and scraping, the walls had not escaped unharmed. So the next stage of the process looked something like this:
 I lost count of how many 5-gallon buckets of spackle we went through (again, with help from some firefighter friends of my FIL), but the quotes we'd gotten from plasterers ranged from $450 to $4500, and we were a bit skeeved by the discrepancy between the estimates so we decided to make this yet another DIY project.
Finally, we got to the part where we could primer the walls.
 And then we painted, and it started to look a little like home. And don't forget that while my photos are mainly of the living room/dining room areas, the same processes of scraping, spackling, sanding, primering, and painting were going on in the master bedroom and upstairs hallway as well. We had a lot of help from friends, and we are grateful not only for their help but also for them staying our friends afterward.
As for the second and third bedrooms, well, they were in somewhat better shape. We painted over the wallpaper in both because there were limits to how much time we had to get the house move-in ready, and for the second bedroom that worked out just fine. In fact, the wallpaper has held firm in that room to this day. We were not so lucky in the third bedroom. The primer and paint soaked into the wallpaper and loosened it from the walls, taking some chunks of drywall with it. Leaving us with no choice but to gut the room down to the framing and redrywall it ourselves. From that experience I learned that drywall is very heavy, especially when you hold it over your head to do the ceiling. And that I'm not good at taping seams.
But with walls cleaned up and repainted, the last major step was to rip out the carpeting (now filled with all sorts of debris) and redo the hardwood floors.

I'd say Ken did a bang-up job, even though most of it was done during the wee hours of the night, after which he'd crawl back to our apartment, pass out, and get up in the morning to go to work. Check out his results:
 Glad I stuck it out and stopped crying over what I'd thought would be an endless money pit. With the walls and hardwood floors taken care of, the smaller projects remaining included putting up hated but necessary wallpaper in the kitchen and bathroom to hold the crumbling walls together until the day would come to gut those rooms (and the day is coming), redoing the kitchen floor with peel-and-stick tiles to make it slightly more durable and attractive, and painting the kitchen cabinets to cover the ugly wood they were made from.
It was much more work than we bargained for, but we were able to get enough of the big stuff done to move in on the last day of our apartment lease.
Having survived our first home-improvement project, the following summer we tackled the next one: the raising of the Garage-Mahal. Which will be the subject of my next post. Thanks for reading!
Saturday, January 2, 2010
Before we begin
Let me wish you all a happy new year and hope to God at the same time that this turns out to be a happy new year for our family. Why wouldn't it be? Well, because we are planning a major addition and remodel of our home, and there is going to be dirt and dust and short tempers and large bills and all sorts of fun we haven't even envisioned yet.
I'm sure I'll be packing this blog full of pictures eventually, but for now let me just sketch out with words what we plan to do to our home.
Picture, if you will, a 1950s-vintage split-level with three bedrooms, one (mostly original) bathroom, and one (mostly original) kitchen. That bathroom is roughly 6' by 9' and is used by three potty trained individuals and one who is gradually moving out of diapers and into the big-boy world of undies. The kitchen is about 10' by 10' with painted wood cabinets (trust me when I say leaving them unpainted was actually worse) and a metal coat cabinet being used as a pantry because there is enough traditional cabinet space for about 5 cans of soup.
Now mentally fill this home with a family: A dad, a mom, two boys (ages almost 5 and 2.5 years), and two beagles who take up more than their fair share of the big bed and every comfortable piece of furniture through the house. (They are, in fact, currently snuggled up next to and partially on top of me. My left foot is asleep.)
Surely some previous owners of both our own home and many of the similarly styled homes throughout the neighborhood have raised families this size and even larger with this 1400sq ft of living space and one overly shared bathroom. We've been talking for about 4 years, though, about building on so we don't feel so cramped. We also have a bit of a storage problem. The closets are minimal, to be generous, and we are finding ourselves surrounded by belongings that really should have homes behind closed doors. If only such space existed.
So a basic overview of our plan:
(1) Build a brand-new kitchen where our deck currently resides. Thankfully, this deck has seen better days and is currently covered with a slight coating of mossiness, so it is not a great loss.
(2) Raise the lower side of the split-level by one story, whereby we will be able to add more bedrooms and (huzzah!) another full bath. The boys will have to share the bathroom, but at least they won't have to share a bedroom forever. They might find it fun right now, but we fully expect that feeling to wear off.
(3) Convert the current kitchen and too-narrow dining room into one dining room that is actually usable. Imagine dining at our home and not having to be one of those poor people trapped between the table and the wall for the duration of the meal. While I usually volunteer to be one such person, at least one other always has to join me if there are six or more of us. You may have been one of those people. You have my sincerest apologies and a promise that we'll have you over for dinner when we have a larger room to eat it in.
A big project, no? And did I mention we're going the DIY route? Before you panic on our behalf I will mention that shortly after we bought our house Ken built a 750 sq-ft detached garage with help from friends and neighbors. Since we're not utterly foolish, we did hire out some important jobs, like excavating and masonry, to experts, and we'll do the same for this project. But most of the grunt work will be done by Ken, his dad, and some of the same friends and neighbors who stuck around after the last project. (Heh heh.)
So welcome to the before-math of our remod-hell. I'll be your tour guide through this grueling, expensive, and stressful, but ultimately rewarding (we hope), process.
Subscribe to:
Posts (Atom)